Pages

Wednesday, December 28, 2011

My Nursery To-Do List

Wow, it's been a while since I last posted!  I hope everyone had very happy holidays so far and were able to spend lots of quality time with family.  I hope to get some pictures of our Christmas decor up soon, as I went more "all out" than I ever have!  

I do have to say, we have been super busy since Thanksgiving, trying to wrap up a bunch of little projects before Christmas.  I am happy to say that we completed each one of them, and while I will share those with you in a bit, first I want to do a "brain dump" of all the things I am thinking about for the nursery.

I am now allowing myself to think about getting that room prepared for our little princess.  Mom hauled out the rocker we will be using when she visited this past week, and I finally have the motivation back to continue working on the dresser.  So without further adieu, here are my thoughts for "Princess Freeman's Vintage Baby Animal Nursery."

The Wall Color

I used a little bit of forethought when I painted this room last summer.  With it being the smallest bedroom, I knew it'd be the nursery.  I went with a pale, almost a buttery, yellow.  The name of the color is Yellow Springs by Dutch Boy.


The Furniture

As a reminder, here are the dresser/changing table and rocker we are going with:


The dresser is about half done.  I had quite the debacle with that, which I'll chronicle once all is done.  I decided to go with a pale, champagne pink called Composed Bloom by Dutch Boy.  Its the middle color on the palate that will pull up.  I picked up the knobs at Hobby Lobby and they are an antique style glass knob.  


So far, I love it!  The chair is going to go white and I think I'll keep the champagne color upholstery.  It's old, but charming, and in really good shape!

We finally made a decision on the crib.  At first I really wanted to go with a Jenny Lind, but for some reason, I just couldn't pull the trigger.  Andy wasn't all that thrilled with it, so I kept searching.  I am so glad I did!  We decided on the Europa Baby Geneva crib:
Photo Courtesy of Toys R Us/Babies R Us


Here's what I love about it:  The front and back feet mimic the dresser.  Its not an exact match, but they both have spindle feet in front and block feet in the back.  Here's what else I love...the slight curves, yet it is very clean and simple.  I also love the subtle details of the pillars in the front, the thick railing, and the fact that the screw holes are on the sides and back.  It's also made of hardwood with a non-toxic finish.  And, this might be the best part, it was a steal!  Walmart had the most competitive price at $159.99 with free site to store shipping.  Most other sites were at $199.99 at least, plus shipping.  It's already shipped and should be here sometime next week.  Can.Not.Wait to see it in person!

Here's what I have yet to make a firm decision on...the mattress.  Any experienced parents out there that can offer some suggestions?

The Bedding

I am lucky enough to have a sewing family, so Mom is making the quilt.  I just ordered the fabric this weekend, and will be going with a jelly roll style quilt.  If you aren't familiar with jelly rolls, they are coordinating fabrics, cut into strips.  Can't wait to see and to show you the finished product, but for now, here is the fabric we settled on:

Photo Courtesy of Around The Block Quilters Shop
I'm thinking I will accent with cream or white colored sheets and bumper pad and curtains, whatever ends up looking best when all is said and done!


The Details

I am going with a baby animal theme, as we are both big animal lovers, and who doesn't love a cute baby animal?  I ordered a book called The Book of Baby Pets, which is a very old, out of print book from the UK that has lovely watercolor baby animal prints.  


The original plan was to frame the plates, but I think I can get some of the prints through Costco's Art Print Center for a very reasonable price, since the more I think about it, the more I hate to take apart such a beautiful book.  It has stories about each of the animals, and I think the coolest part is that there are two inscriptions inside the cover from each time it was gifted.


Today, I stopped by a second hand store that is a associated with a senior center, so they have a tendency to have lots of good, antique stuff, and surprisingly, have a good amount of baby stuff.  I was thrilled to snag this antique linen pillowcase cover and sheet for only $5:


They are a very pale pink with white crocheting on the edge and then two little scotty dogs embroidered on the pillow flap.  I'll keep the pillowcase as is and use it with the chair.  I am thinking I might convert the sheet into a very simple, lightweight quilt with ties.

For the side table, I am thinking this glass lamp in pink:

JONSBO EGBY Table lamp, glass pink, beige Height: 13 " Shade diameter: 9 " Cord length: 86 "  Height: 32 cm Shade diameter: 22 cm Cord length: 218 cm
Photo Courtesy of Ikea
And for the ceiling light, I'd love to do a vintage style chandelier.   I have found a couple affordable options:


Portfolio 3-Light The Olde World Antique White Chandelier

Bel Air Lighting 3-Light The Old World Antique White Chandelier
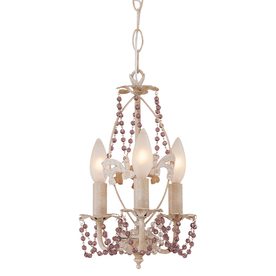
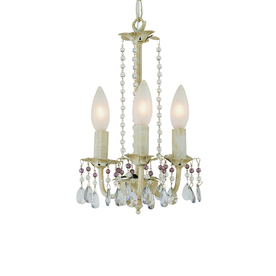
Chandelier Photos Courtesy of Lowe's

Just tell me what little girl's vintage nursery wouldn't look great with one of these, or something similar?  

What's Left

I still need to make a decision on a rug.  I'd like to go with a handmade circular rag rug.  There are some super sweet ones on Etsy, made out of old sheets and are crocheted together.  What I like about those is that they are machine washable, they have character, and they would play into the vintage/shabby chic look I am going for.  My other option is a lightly patterned wool rug.  

As I mentioned above, I still need to decide on sheets, bumper pad, crib skirt, and curtains.  I am going to wait and see what will look best with the quilt.  I also need to figure out a low profile table to use next to the rocker.  

There's lots of little details too that I won't be showing until the grand reveal or until she's here (like her name).  I gotta keep you coming back somehow, don't I?  

So what do you think of my Vintage Baby Animal nursery?  I am curious to hear what you think of the chandelier, and also would love your suggestions on a mattress.  Man, there are a lot of options out there! 

Sunday, November 13, 2011

One Thing Leads to Another

Call it nesting, call it early spring cleaning, call it whatever you want, but this weekend, I whipped three closets into shape.  As it turns out, each closet makeover is somewhat related to the one before it, and it has a little Pinterest Inspiration mixed in.  But I will get to that.

Closet #1: The Linen Closet. We looked at this closet last week when Andy installed this shelf in the bathroom.  By moving all the towels to the bathroom, we were left with this lovely expanse.


It had been stirring around in my mind that I really wanted to move the laundry hamper out of our closet for a number of reasons, but I had one top reason.  Each week, we would start out in good shape, as the basket was empty.  By the end of the week, the pile got very high and started to co-habitate with Andy's suits.  Not what I call a good time.


So I did some measuring, and luckily, it fit in the linen closet!  I may have done a happy dance in the hallway.  It was tight, but the door shuts, and I call that success!  


Closet #2: The Coat Closet.  This closet is right off our kitchen, at the top of our semi-flight of stairs from the living room.  Here's what it looked like before:


This closet holds some of our coats, our broom, and dog food, and in the storage cabinet on the floor holds all our scarves, hats, and gloves.  Things tended to fall out when I opened the door, and while I love being whacked over the head by the broom, I knew there was a better use of space here, and hopefully a way to fit the vacuum.  Here's where Pinterest comes in.  I saw this pin and though, wow, that could work!


A shoe holder for gloves, hats and scarves!  The only problem I could see was that we have a very narrow door.  That's just part of being in a house that was built in the 50's...the standard sizes of yesterday are not the standards of day.  So anyway, this door is 20 inches wide.  Almost every single one I saw was at least 22 inches wide.  No go.  But I'm nothing if not stubborn and determined (just ask Andy), so I kept the search up for a smaller one.  

Saturday morning, I was in Meijer, and I found it...19 inches wide and $7.99.  When I got to the register I realized I had a Catalina for 15% of General Merchandise.  Double score!  When I got home,  I may have not gotten halfway done putting groceries away before I dug in pulling everything out of the closet.  Along the way, I found one glove without a mate, a bag of left over trim pieces, and lots more dust bunnies than I care to share.  We were also able to add two coats to the donate pile.  Long story short, here's what we ended up with:


Top shelf: handheld vacuum and a basket with all the guys' baseball caps (with room to spare).


On the rack: coats, with four hangers to spare.

On the wall: the broom and swiffer.  The individual holders were from The Container Store, and we've had them a while.  I installed these myself.  You can call me Mrs. Handy Andy.


On the floor: steam mop (in the back), vacuum, and dog food.


On the door: gloves, winter hats, scarves, umbrellas, hand-vac parts, iPod arm band, etc...


Closet #3: The Master Bedroom Closet.  When we moved the hamper to the linen closet, we were left with a nice expanse for more organization.  My target to whip into shape?  Our shoes.  They formerly lived under the bottom rack of clothes.


While I had already moved them out before taking this picture, this is pretty much what it looked like before, aside from a random toe or heel peeking out.  That was super fun in the mornings when I needed to find a specific pair of shoes.  Digging around, under the clothes, on my hands and knees, not to mention more dust bunnies.  Good times.  

Well, we just so happened to have a plastic shelving unit left over from the coat closet.  I love using what we have on hand for creative solutions, so I packed that baby full of shoes and put it in the place of the hamper.


The only ones that didn't fit were Andy's dress shoes, so those go on top for easy access.   That small change made all the difference in the closet.  It actually feels bigger in there, and we can see our shoes!

The verdict on all three overhauls?  Andy said to each one of them, oh yeah, that's a good idea.  That, my friends, is success in my book.  

So did anyone else do some organizing this weekend?  Oh, you wanted to know about the nursery dresser?  Well, lets just say while I still love her, but I don't like her very much right now.  I'll explain in a future post...

Sunday, November 6, 2011

Pinterest Inspiration

Well, I didn't make any progress on the nursery dresser this week, but I did knock something else off my to-do list.

I'm not sure about you, but I love Pinterest.  It's a DIY'ers haven, and gives me plenty of inspiration, help when I don't know which way to go, and lots of exposure to new blogs with new ideas.  A while back, I pinned this idea for extra storage in our bathroom:


Bingo!  We are always looking for better ways to store things, to make more room in closets, etc.  For some reason, I never thought of going up for storage, especially extra towels.  Our linen closet was the current residence for our extra towels, but the space could really be used otherwise, especially since an entire room and closet are about to be displaced to make room for the Little Miss.

This weekend during a trip to Menards, we picked up a 12x36 inch board and used a couple brackets that were recently freed up due to another project (more on that to come soon), and turned this:


into this:


And took our hall closet from this:


to this:


Look at the huge amount of space that's been freed up!  And when we reconfigure the rest of the closet (another project for another weekend, along with getting the trim up), there will hopefully be enough room for the vacuum and the Spot Bot.  Mission accomplished!  

So how was your weekend?  Did you make storage in areas where you thought storage options were tapped out?  Or are you as addicted to Pinterest as I am?  There should be a support group...

Sunday, October 30, 2011

Progress

Over the past couple weeks, I took somewhat of a break from doing anything that wasn't in my opinion directly vital to my survival, so I have worked, slept, showered, and ate.  That's not to say that I haven't had a million projects running through my head.  So this afternoon, I decided to tackle one head on.  I started the first step of the nursery dresser/changing table revamp and sanded everything down.  


I used 180 grit paper with my palm sander.  I'm not really going for a complete strip, as I will be painting this piece.  I also had to be conscience of the veneer and to not go through it.  So, my goal was to get the shine off and get a smooth surface for the primer and paint to stick.  After I sanded down, I filled in the chips in the veneer and will let them sit until probably next weekend and then will sand those down.  I was also able to pop off the key holes with a very small screwdriver.  I have yet to decide whether I am going to just clean them or give them a new color.  I chose to leave the legs alone for now...mostly because I didn't feel like standing on my head to sand them.


Now, onto my color choice.  Since we are having a girl, and I am 100% going for a girly nursery, I am leaning heavily towards pink.  I'm thinking a very light champagne pink.  Andy has placed a bet that I will paint it pink and then not like it and change it to white.  We shall see.  I have at least a week to make up my mind officially.  I am also debating on handles...at first, I was sure I'd go with glass knobs. Very chic and antique.  But now some other ideas have surfaced.  Bottom line, I don't want this to be typical...I want it to be unique without going overboard.

I also realized I should give you a "before" shot of the nursery.  So, here's how it sits today:


We are going to keep the yellow paint, but I'd really like to do a horizontal stripe in a gloss or something like that to add some texture.  It's a pretty small room at 10x10 but the closet is good size, especially for the era this house was built in (late 50's/early 60's).  

So, have any of you out there just been taking it easy lately and now ready to jump head first into a list of projects?  Do share!

Tuesday, October 11, 2011

The One

I've been on the hunt for a dresser for the nursery.  Our plan (ok, my plan) has been to pick one up cheap second hand, preferably 70's or older, and refinish/paint it.  I wanted one that was low so it could be used as a changing table too.  Yesterday, I found one that I loved.  And then I went to ask the seller about it and it was gone.  I was sad.  It was $30 and just what I had imagined.

Today when I walked out of work, I took a quick peek at Craigslist and found "the one."  Antique, all wood low dresser...for $30!  I called immediately and arranged a time to see it tonight.  A couple hours later, this true beauty is sitting in my garage...


I love it so much!  I am thinking glass knobs, but I am really debating with myself about whether I follow the hot trend and paint it, or if I stain a deep espresso to give it the "old yet modern" look.  What do you think?  I really am open to ideas here...

And just because I am sure you would love to see more, here is the awesome rocker my Mom found in a thrift store for $45!


Haven't decided if the fabric will stay or go, but I have to figure out a way to refinish the wood on it.  The cushions seem to be pretty well in place on it, so if I go that route, it may have to be professionally done.  Any advice out there on something like this?  Does it seem complex but is actually really easy?

Sunday, September 25, 2011

My Grand Idea and How it Was Thwarted

So, probably six months ago, I picked up a cheese dome from the thrift store for something like $3.  You know, one of these things.  I really liked it, but wasn't 100% sure how I'd end up using it.  So I cleaned it up (by the way, baby oil is really good for getting tape residue off pretty much anything) and it sat.  And sat.  And sat.

Until one morning, on the way to work, I decided it would look really good as a cloche.  Yeah!  I'd get a candlestick and Liquid Nail it to the bottom, and then I'd spray paint it black and then I could put cute things in it like birds in nests, and fruit and seasonal stuff.  Oh boy, I was so excited and proud of myself for coming up with such a cool idea.

So I got online to see if anyone else had such a great idea as me, and I found out I was a little late to the Cheese Cloche Party.  Like a year late.  As in almost everyone had a post out there about how they had the EXACT same idea as me.  Just Google Cheese Cloche and you will see what I mean.  Sigh.

Well, I was still in love with the idea, so I stopped by the thrift store over lunch and picked a couple candle sticks up for a dollar each.


I liked how it looked, but on another trip over the weekend to Goodwill, I found this one for a dollar and loved it even more.


I popped the metal part off with a screwdriver and a hammer pretty easily, cleaned it all up, and then turned my attention to the cheese plate.  It had little rubber feet that needed to come off.


Using Liquid Nails and a heavy book, I glued the two together and then let the book do most of the work.


I had a bit of oozing, but I knew the paint would cover that up.  Once I had that one done, I realized I had two candlesticks that were not being used, so I set out to find something at least one could elevate.  I found this oddball bowl that's been sitting around for well over a year.


So in the same fashion, I flipped 'er over and glued the candlestick to the bottom.  Once they were stuck together all good and strong, I took them outside for a good coat of black spraypaint (don't worry, I wore a mask).  I then gave them a coat of spray topcoat, since I knew there could be things put in these contraptions that could scrape the paint.  

Once all dry, I brought them in and made quite the little fall arrangement on our dining room table.


I'm really happy how it all turned out.  I'll give you a tour...

Here's the guy that started it all, complete with a ceramic pumpkin (from the Dollar Store) and the leftover ribbon from the wreath project.  The little pumpkin in front is also from the Dollar Store).


Then we move over to the bowl.  He also turned out very nice, and is displaying some wooden fruit I picked up at an antique mall for a dollar.  Yes, a dollar, for all of it.


Then we have an apothecary jar full of pinecones and the leftover pinecones on a candle plate I've had for years.  I have a small addiction to apothecary jars.  I own six...so far.


And quite possibly my favorite little detail is this hand carved wood owl I bought my Dad in Mexico when we were there on our honeymoon.  He came back to live with me when Dad passed.


I put a napkin down as a backdrop for the table and there are couple candles you can see in the background.  Those are leftover from our wedding, but you can get them at Hobby Lobby.  Lastly, there is a tiny galvanized pot, just for a little glitz.  You can probably see him in the background of the pictures above. 

So that's my fall vignette!  I plan on swapping out a few things and keeping the same type of thing going for each of the seasons.  Can't wait for pretty Christmas balls and my deer to make an appearance!  Is anyone else decorating for fall, or looking forward to Christmas decorating?  Am I the only one with an addiction to apothecary jars?  It's unhealthy, I know.

Monday, September 19, 2011

Saturday, September 10, 2011

Color Blitz!

Hope everyone is enjoying a beautiful fall weekend!  We are watching the Iowa/Iowa State football game today and hoping the Cy-Hawk Trophy spends the next year in Ames!  It's been four years since it's been there, so it's time for sure!  If you are from Iowa, went to either school, or just spent any time in the state during the legendary game day weekend, you know how big of a deal this game is.  But you didn't stop over here to read about football, did you?  On to my latest project!

So ever since I domesticated and bought a house, I have been pining for seasonal wreaths.  But man, are they expensive!  Especially since I am turning to Pottery Barn and the like for my dream accessories.  My Mom always told me to wait till they go on clearance at the end of the season, but that never worked out for one reason or another.  They were either picked over, still too pricey, or I simply forgot to look.  I had thought about making my own wreath but it always seemed too expensive.

But then I found a solid grapevine wreath at my favorite thrift store for $2, and I figured, why not?


But yeah, those 80's flowers had to go.  They were easy to take out.  Get a load of the grime that was on them.  Yuck!  I might have sneezed a bit while pulling these off.


So once everything was off, I gave the entire wreath a coat of chocolate brown spray paint.  I wanted to make sure to have a dark, rich base for the fall.  At this point, I was undecided about what I wanted to decorate the wreath with.  I liked the idea of leaves, but I was also liking the idea of some brightly colored flowers.  I looked at Hobby Lobby but didn't see anything I was too crazy about.  I had heard that the Dollar Store can be a DIY'ers paradise, so I gave it a shot.  $12 later, I came home with this pile.  


Sorry for the HORRIBLE picture quality, but I bought these last night and I wanted to work on it right then and there.  So, no natural light for good pictures.  First thing I did was wrap the wreath in some thick, fall ribbon.  I did this so that I'd have a little bit of sparkle, to fill in any holes, and to help hold the stems in.


Please disregard the stuff sitting on the floor in the corner.  Everybody's house has some of that, right?

Then I cut the stems of the flowers so they were all separate.  I took regular scissors and clipped the outside and then bent the wire part till it snapped.  I just slid the flowers under the grapevine and the ribbon in a somewhat random order.  There's no real rhyme or reason to this...it's all about your taste and what you like.


And here's my finished result!  At first, I wasn't sure.  But the more I looked at it, the more it grew on me.  I really like how bright it is, but still within the fall color theme.


I put it together in a little over an hour (not counting shopping or painting) while we watched the season finale of Burn Notice.  I couldn't tell you what all the kinds of flowers I used, but I can identify Dahlias and Gerberas.  I also used some twig like things as fillers.  I went with orange, red, yellow, green, and purple for the flowers and the ribbon is a sheer burnt orange with some gold on the outside.  I didn't glue anything in for a couple reasons.  They flowers stay in place pretty well on their own, and next year, I might want to change it up!  Maybe with leaves.  

So what have you been doing to get ready for fall?  Anyone had their air turned off for a while?  Or how about that season finale of Burn Notice?  Anyone else a little surprised??  And by the way, State is in the lead with 2 minutes left in the 3Q.  Whoot whoot!