Pages

Sunday, January 29, 2012

My Version of the Cloth Diaper Burp Cloth...and Puppies!


I recently rediscovered the joy of sewing.  My Mom handed down an older White machine that has served me well through my new hobby.  So well that I decided to take on the challenge of making some burp cloths for the the little one.  Every where I have read says that old fashioned cloth diapers make the best burp cloths due to their absorbent nature.  So, when I ran across a package of 11 Gerber cloth diapers  at TJ Maxx marked down to $6, I said, heck ya!  The package was marked as having 12, but the one missing must have accounted for the clearance price.  When I got them home, I realized they weren't the six-ply ones that most people used.  They are called Flatfold Premium Cloth Diapers.  

Photo Courtesy of gerberchildrenswear.com
In a way, I was kind of excited because I could customize the size of cloth I made.  However, most of the tutorials online were for the birdseye or six-ply type, so I knew I'd have to figure this one out for myself!

Once they were all washed and dried and ironed, I decided folding them into even thirds was the best way to go.  It layered them up so they would be thicker, but it also made them about as wide as my shoulder and long enough to cover to my chest and the middle of my back.  Hopefully enough puke and drool coverage.  


I then ironed them into the thirds to help hold their form while sewing.  They ended up being nine inches wide.  I think the flannel-backed ones are super cute and a way to add some fun to something normally, um, drab and practical.  Plus, it adds another layer to the thickness.  I hit up Joanne's where they were having a half off sale and got a third of a yard of ten different flannels.  At nine inches wide, I could have just gotten by with a fourth of a yard, but I wanted some wiggle room, just in case.  

Next step was to line them up on the flannel:


You'll see I left myself some width on each of the sides (in the picture above I haven't cut from the main piece yet).  I left about 3/4" on each side.  I was left with a little less than half of the flannel for a future project.  I placed the flannel face up and considered the middle of the diaper the "front" and put that face down.  In the picture of the folded diaper above, if you start at the top and label the parts A, B, and C, B would be my "front".  Hope that makes sense.  

I got to going too fast and neglected to take pictures, so hopefully this will all make sense.  I then pinned and then sewed around the perimeter, careful to grab all the layers of the diaper to avoid bunching in future washings.  Make sure you leave an opening to turn them right side out.  Once done, flipped the cloth over so the flannel side was up and clipped the corners diagonally and trimmed the extra.  It will make it easier if you leave a little "tail" where the open part is, since you'll need to stitch that down in the next step.

Ok, so now you're ready to flip it right side out.  I used a seam ripper cover to push the corners out, but you could use a chopstick or something long like that. Then, go back to your ironing board and press everything down nice and even and flat.  On the section that has the open part, tuck in and press down so its nice an even, hopefully hiding that it's even there.  

For the next step, I used a guide that screws into the plate on the sewing machine that helps you keep a straight seam.  I straight stitched around the perimeter, making sure to catch the open part.  Then, for added security against bunching, I stitched two straight lines down the middle of the entire thing.  You should be able to see them in the picture below.  


And that's it!  I went ahead and laundered them all again since I had man handled them so much and I wanted them to be as clean as possible for the little one.  I have to say, they are thicker than what I initially anticipated, and I really like each of them.  I have no experience with burping a baby, but I am thinking these will work nicely.  Want to see all ten?  I didn't use any theme with these; I just grabbed whatever flannel I liked best and went with it.  I could divide them up into three categories though:


Mature and Sophisticated


Cute Birdies


And, of course, nursery prints

The pink and yellow one in the bottom picture was my steal of the day.  Total, that one cost me 88 cents to make, as I got exactly a third of a yard as a remnant and remnants were 70% off.  The rest of them cost $1.67 approximately to make, since the fabric was on sale and I got such a great deal on the diapers.  I also ended up with a nice scrap stockpile of all these fun flannel prints.  Each one took me probably 15 minutes or so to make, so a pretty quick, easy, and cheap project!  

Now, I hate to do this, but since I haven't found another tutorial online like this, I ask that if you are going to make these, please do not do so for a profit.  If you plan to blog about your experience making these cloths, please link back to this post.  In the blogging community, it's only the right and fair thing to do!   Thank you, and I trust you understand!  

Onto funner things...this is where my first babies have been most of the day, if they weren't chasing the warm sun rays...


Man, I love my fur-kids.  Just a lazy Sunday afternoon in the Freeman household!

Tuesday, January 24, 2012

Quilt Progress

My Mom just shared a progress picture of the peanut's quilt, and I thought you might like a sneak peak...


It's a cell phone picture, but it gives you an idea of what we will have.  I have to say, I am a bit surprised that there aren't more colors in it.  Mom was surprised too when she unrolled the jelly roll to start working on it.  The preview pictures we had of it showed so many more colors.  But, I do like it, and I think it will go really well with the theme we are working with.  It's soft and feminine and vintage.  I can't wait to see it all done and in the room.

One more project in progress, only what feels like a million more to go...

Tuesday, January 17, 2012

How I Almost Pulled My Hair Out Refinishing a Dresser

And that title is no exaggeration.  Ask Andy, my brother, my mom, the guy at Home Depot.  This dresser was not easy.  But I am so glad I hung on and kept working at it.  I just love the finished result, so it was worth all the headache.  Sometimes, I go in the nursery just to look at it.  I'm not the only one that does that, right?

Ok, so I will give you the skinny on what I learned by refinishing this dresser.  I am by no means an expert, but I can offer a few pointers.

1. Use Oil Based Primer.  I cannot stress this enough when you are dealing with a piece of furniture that has an old stain on it, especially when you suspect that the stain was oil based.  Here's the mistake I made...I used water based primer, which in the past has been great.  After the primer coat, I noticed a bit of seepage.  I though, eh, the paint will cover it.  Wrong.  So, so, so wrong.  I put four coats of paint on, only to find out that the stain was still seeping through.  Instead of a nice, pale, champagne pink, I was getting a reddish baby pink.  I have nothing against baby pink...just not what I was going for.  I didn't take a picture because I was so incredibly frustrated I couldn't see straight.

2. Oil Based Primer can go over water based paint.  I was shocked!  But the guy at Home Depot mentioned that after I said I would have to sand everything down.  I was skeptical, but he was right!  I did sand down the top a bit just to pull back a few of the layers, but there was still plenty on there.  And to my amazement, there was no bubbling, and she is still going strong!  As you might guess, I was highly relieved to not have to sand that bad boy down again.

3. Sand between coats.  Because the primer, paint, and poly will pull the grain of the wood up, its important to sand well with high grit paper between coats to get it back to smooth.  I was going for an ultra smooth feel, so I used 220 and 310 grit paper between coats.

However, do not make the same mistake I made on one of the drawers.  After applying the primer, I found the grain was pulling up more than the high grit could take back down.  I used some 180 grit (not the mistake) but it took off some of the primer.  Silly me, I thought it was so little that the paint would still cover it.  That was the mistake.  After the poly was on and I was attaching the knobs, I noticed a bit of the old stain coming through.  At that point though, I was so over it I couldn't even fathom sanding that drawer down again.  And, to be honest, a person would have to be looking for it in just the right light to find it.  I am just that picky and Type A to see it.  But I am living with it, and haven't lost it yet.

One last point, something I already knew, but its worth mentioning.  Several light coats are so much better than a couple heavy coats.  Trust me, you will like the results much better.

Now, onto the materials I used.  For the priming stage, I settled on Kilz Oil Based Original primer.  It was applied it with a foam brush and a foam roller.  I didn't want to clean good brushes with mineral oil, so I used ones that could be tossed.  For the paint, I used two test pots of Dutch Boy Composed Bloom.  I could have gotten away with one test pot had it not been for the nightmare in Point #1 above.  For the poly, we used Minwax Polycrylic.  It has a way of not yellowing over time.  I have used it in the past on other pieces, and that statement holds true, even a couple years down the road.

Now, if I could just work up the energy to start working on that rocker....

Monday, January 9, 2012

The One is Done!

I'll be back with the play-by-play, but the dresser is D-O-N-E!  This turned out to be more of a challenge than I ever imagined, but man, I am thrilled with how it turned out.

If you remember, this is what we started with...


Here's a progress shot...


And here she is, two coats of primer, four coats of paint, three coats of poly, and eight new knobs later...


And, we might have picked up a new friend along the way.  His name is Spot, is incredibly cuddly and soft, was $4 at Tuesday Morning, and I could not imagine leaving the store without him.  He lives on the dresser, waiting for a special little girl to play with him someday.


Like I said, I'll be back with all the deets, my tips, and what-not-to-do's soon!  

Wednesday, December 28, 2011

My Nursery To-Do List

Wow, it's been a while since I last posted!  I hope everyone had very happy holidays so far and were able to spend lots of quality time with family.  I hope to get some pictures of our Christmas decor up soon, as I went more "all out" than I ever have!  

I do have to say, we have been super busy since Thanksgiving, trying to wrap up a bunch of little projects before Christmas.  I am happy to say that we completed each one of them, and while I will share those with you in a bit, first I want to do a "brain dump" of all the things I am thinking about for the nursery.

I am now allowing myself to think about getting that room prepared for our little princess.  Mom hauled out the rocker we will be using when she visited this past week, and I finally have the motivation back to continue working on the dresser.  So without further adieu, here are my thoughts for "Princess Freeman's Vintage Baby Animal Nursery."

The Wall Color

I used a little bit of forethought when I painted this room last summer.  With it being the smallest bedroom, I knew it'd be the nursery.  I went with a pale, almost a buttery, yellow.  The name of the color is Yellow Springs by Dutch Boy.


The Furniture

As a reminder, here are the dresser/changing table and rocker we are going with:


The dresser is about half done.  I had quite the debacle with that, which I'll chronicle once all is done.  I decided to go with a pale, champagne pink called Composed Bloom by Dutch Boy.  Its the middle color on the palate that will pull up.  I picked up the knobs at Hobby Lobby and they are an antique style glass knob.  


So far, I love it!  The chair is going to go white and I think I'll keep the champagne color upholstery.  It's old, but charming, and in really good shape!

We finally made a decision on the crib.  At first I really wanted to go with a Jenny Lind, but for some reason, I just couldn't pull the trigger.  Andy wasn't all that thrilled with it, so I kept searching.  I am so glad I did!  We decided on the Europa Baby Geneva crib:
Photo Courtesy of Toys R Us/Babies R Us


Here's what I love about it:  The front and back feet mimic the dresser.  Its not an exact match, but they both have spindle feet in front and block feet in the back.  Here's what else I love...the slight curves, yet it is very clean and simple.  I also love the subtle details of the pillars in the front, the thick railing, and the fact that the screw holes are on the sides and back.  It's also made of hardwood with a non-toxic finish.  And, this might be the best part, it was a steal!  Walmart had the most competitive price at $159.99 with free site to store shipping.  Most other sites were at $199.99 at least, plus shipping.  It's already shipped and should be here sometime next week.  Can.Not.Wait to see it in person!

Here's what I have yet to make a firm decision on...the mattress.  Any experienced parents out there that can offer some suggestions?

The Bedding

I am lucky enough to have a sewing family, so Mom is making the quilt.  I just ordered the fabric this weekend, and will be going with a jelly roll style quilt.  If you aren't familiar with jelly rolls, they are coordinating fabrics, cut into strips.  Can't wait to see and to show you the finished product, but for now, here is the fabric we settled on:

Photo Courtesy of Around The Block Quilters Shop
I'm thinking I will accent with cream or white colored sheets and bumper pad and curtains, whatever ends up looking best when all is said and done!


The Details

I am going with a baby animal theme, as we are both big animal lovers, and who doesn't love a cute baby animal?  I ordered a book called The Book of Baby Pets, which is a very old, out of print book from the UK that has lovely watercolor baby animal prints.  


The original plan was to frame the plates, but I think I can get some of the prints through Costco's Art Print Center for a very reasonable price, since the more I think about it, the more I hate to take apart such a beautiful book.  It has stories about each of the animals, and I think the coolest part is that there are two inscriptions inside the cover from each time it was gifted.


Today, I stopped by a second hand store that is a associated with a senior center, so they have a tendency to have lots of good, antique stuff, and surprisingly, have a good amount of baby stuff.  I was thrilled to snag this antique linen pillowcase cover and sheet for only $5:


They are a very pale pink with white crocheting on the edge and then two little scotty dogs embroidered on the pillow flap.  I'll keep the pillowcase as is and use it with the chair.  I am thinking I might convert the sheet into a very simple, lightweight quilt with ties.

For the side table, I am thinking this glass lamp in pink:

JONSBO EGBY Table lamp, glass pink, beige Height: 13 " Shade diameter: 9 " Cord length: 86 "  Height: 32 cm Shade diameter: 22 cm Cord length: 218 cm
Photo Courtesy of Ikea
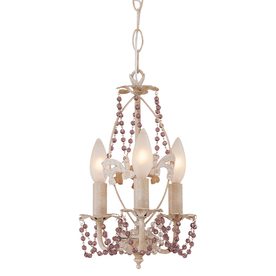
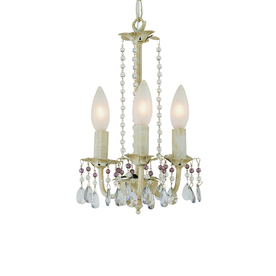
And for the ceiling light, I'd love to do a vintage style chandelier.   I have found a couple affordable options:


Portfolio 3-Light The Olde World Antique White Chandelier

Bel Air Lighting 3-Light The Old World Antique White Chandelier
Chandelier Photos Courtesy of Lowe's

Just tell me what little girl's vintage nursery wouldn't look great with one of these, or something similar?  

What's Left

I still need to make a decision on a rug.  I'd like to go with a handmade circular rag rug.  There are some super sweet ones on Etsy, made out of old sheets and are crocheted together.  What I like about those is that they are machine washable, they have character, and they would play into the vintage/shabby chic look I am going for.  My other option is a lightly patterned wool rug.  

As I mentioned above, I still need to decide on sheets, bumper pad, crib skirt, and curtains.  I am going to wait and see what will look best with the quilt.  I also need to figure out a low profile table to use next to the rocker.  

There's lots of little details too that I won't be showing until the grand reveal or until she's here (like her name).  I gotta keep you coming back somehow, don't I?  

So what do you think of my Vintage Baby Animal nursery?  I am curious to hear what you think of the chandelier, and also would love your suggestions on a mattress.  Man, there are a lot of options out there! 

Sunday, November 13, 2011

One Thing Leads to Another

Call it nesting, call it early spring cleaning, call it whatever you want, but this weekend, I whipped three closets into shape.  As it turns out, each closet makeover is somewhat related to the one before it, and it has a little Pinterest Inspiration mixed in.  But I will get to that.

Closet #1: The Linen Closet. We looked at this closet last week when Andy installed this shelf in the bathroom.  By moving all the towels to the bathroom, we were left with this lovely expanse.


It had been stirring around in my mind that I really wanted to move the laundry hamper out of our closet for a number of reasons, but I had one top reason.  Each week, we would start out in good shape, as the basket was empty.  By the end of the week, the pile got very high and started to co-habitate with Andy's suits.  Not what I call a good time.


So I did some measuring, and luckily, it fit in the linen closet!  I may have done a happy dance in the hallway.  It was tight, but the door shuts, and I call that success!  


Closet #2: The Coat Closet.  This closet is right off our kitchen, at the top of our semi-flight of stairs from the living room.  Here's what it looked like before:


This closet holds some of our coats, our broom, and dog food, and in the storage cabinet on the floor holds all our scarves, hats, and gloves.  Things tended to fall out when I opened the door, and while I love being whacked over the head by the broom, I knew there was a better use of space here, and hopefully a way to fit the vacuum.  Here's where Pinterest comes in.  I saw this pin and though, wow, that could work!


A shoe holder for gloves, hats and scarves!  The only problem I could see was that we have a very narrow door.  That's just part of being in a house that was built in the 50's...the standard sizes of yesterday are not the standards of day.  So anyway, this door is 20 inches wide.  Almost every single one I saw was at least 22 inches wide.  No go.  But I'm nothing if not stubborn and determined (just ask Andy), so I kept the search up for a smaller one.  

Saturday morning, I was in Meijer, and I found it...19 inches wide and $7.99.  When I got to the register I realized I had a Catalina for 15% of General Merchandise.  Double score!  When I got home,  I may have not gotten halfway done putting groceries away before I dug in pulling everything out of the closet.  Along the way, I found one glove without a mate, a bag of left over trim pieces, and lots more dust bunnies than I care to share.  We were also able to add two coats to the donate pile.  Long story short, here's what we ended up with:


Top shelf: handheld vacuum and a basket with all the guys' baseball caps (with room to spare).


On the rack: coats, with four hangers to spare.

On the wall: the broom and swiffer.  The individual holders were from The Container Store, and we've had them a while.  I installed these myself.  You can call me Mrs. Handy Andy.


On the floor: steam mop (in the back), vacuum, and dog food.


On the door: gloves, winter hats, scarves, umbrellas, hand-vac parts, iPod arm band, etc...


Closet #3: The Master Bedroom Closet.  When we moved the hamper to the linen closet, we were left with a nice expanse for more organization.  My target to whip into shape?  Our shoes.  They formerly lived under the bottom rack of clothes.


While I had already moved them out before taking this picture, this is pretty much what it looked like before, aside from a random toe or heel peeking out.  That was super fun in the mornings when I needed to find a specific pair of shoes.  Digging around, under the clothes, on my hands and knees, not to mention more dust bunnies.  Good times.  

Well, we just so happened to have a plastic shelving unit left over from the coat closet.  I love using what we have on hand for creative solutions, so I packed that baby full of shoes and put it in the place of the hamper.


The only ones that didn't fit were Andy's dress shoes, so those go on top for easy access.   That small change made all the difference in the closet.  It actually feels bigger in there, and we can see our shoes!

The verdict on all three overhauls?  Andy said to each one of them, oh yeah, that's a good idea.  That, my friends, is success in my book.  

So did anyone else do some organizing this weekend?  Oh, you wanted to know about the nursery dresser?  Well, lets just say while I still love her, but I don't like her very much right now.  I'll explain in a future post...

Sunday, November 6, 2011

Pinterest Inspiration

Well, I didn't make any progress on the nursery dresser this week, but I did knock something else off my to-do list.

I'm not sure about you, but I love Pinterest.  It's a DIY'ers haven, and gives me plenty of inspiration, help when I don't know which way to go, and lots of exposure to new blogs with new ideas.  A while back, I pinned this idea for extra storage in our bathroom:


Bingo!  We are always looking for better ways to store things, to make more room in closets, etc.  For some reason, I never thought of going up for storage, especially extra towels.  Our linen closet was the current residence for our extra towels, but the space could really be used otherwise, especially since an entire room and closet are about to be displaced to make room for the Little Miss.

This weekend during a trip to Menards, we picked up a 12x36 inch board and used a couple brackets that were recently freed up due to another project (more on that to come soon), and turned this:


into this:


And took our hall closet from this:


to this:


Look at the huge amount of space that's been freed up!  And when we reconfigure the rest of the closet (another project for another weekend, along with getting the trim up), there will hopefully be enough room for the vacuum and the Spot Bot.  Mission accomplished!  

So how was your weekend?  Did you make storage in areas where you thought storage options were tapped out?  Or are you as addicted to Pinterest as I am?  There should be a support group...