Pages

Sunday, September 25, 2011

My Grand Idea and How it Was Thwarted

So, probably six months ago, I picked up a cheese dome from the thrift store for something like $3.  You know, one of these things.  I really liked it, but wasn't 100% sure how I'd end up using it.  So I cleaned it up (by the way, baby oil is really good for getting tape residue off pretty much anything) and it sat.  And sat.  And sat.

Until one morning, on the way to work, I decided it would look really good as a cloche.  Yeah!  I'd get a candlestick and Liquid Nail it to the bottom, and then I'd spray paint it black and then I could put cute things in it like birds in nests, and fruit and seasonal stuff.  Oh boy, I was so excited and proud of myself for coming up with such a cool idea.

So I got online to see if anyone else had such a great idea as me, and I found out I was a little late to the Cheese Cloche Party.  Like a year late.  As in almost everyone had a post out there about how they had the EXACT same idea as me.  Just Google Cheese Cloche and you will see what I mean.  Sigh.

Well, I was still in love with the idea, so I stopped by the thrift store over lunch and picked a couple candle sticks up for a dollar each.


I liked how it looked, but on another trip over the weekend to Goodwill, I found this one for a dollar and loved it even more.


I popped the metal part off with a screwdriver and a hammer pretty easily, cleaned it all up, and then turned my attention to the cheese plate.  It had little rubber feet that needed to come off.


Using Liquid Nails and a heavy book, I glued the two together and then let the book do most of the work.


I had a bit of oozing, but I knew the paint would cover that up.  Once I had that one done, I realized I had two candlesticks that were not being used, so I set out to find something at least one could elevate.  I found this oddball bowl that's been sitting around for well over a year.


So in the same fashion, I flipped 'er over and glued the candlestick to the bottom.  Once they were stuck together all good and strong, I took them outside for a good coat of black spraypaint (don't worry, I wore a mask).  I then gave them a coat of spray topcoat, since I knew there could be things put in these contraptions that could scrape the paint.  

Once all dry, I brought them in and made quite the little fall arrangement on our dining room table.


I'm really happy how it all turned out.  I'll give you a tour...

Here's the guy that started it all, complete with a ceramic pumpkin (from the Dollar Store) and the leftover ribbon from the wreath project.  The little pumpkin in front is also from the Dollar Store).


Then we move over to the bowl.  He also turned out very nice, and is displaying some wooden fruit I picked up at an antique mall for a dollar.  Yes, a dollar, for all of it.


Then we have an apothecary jar full of pinecones and the leftover pinecones on a candle plate I've had for years.  I have a small addiction to apothecary jars.  I own six...so far.


And quite possibly my favorite little detail is this hand carved wood owl I bought my Dad in Mexico when we were there on our honeymoon.  He came back to live with me when Dad passed.


I put a napkin down as a backdrop for the table and there are couple candles you can see in the background.  Those are leftover from our wedding, but you can get them at Hobby Lobby.  Lastly, there is a tiny galvanized pot, just for a little glitz.  You can probably see him in the background of the pictures above. 

So that's my fall vignette!  I plan on swapping out a few things and keeping the same type of thing going for each of the seasons.  Can't wait for pretty Christmas balls and my deer to make an appearance!  Is anyone else decorating for fall, or looking forward to Christmas decorating?  Am I the only one with an addiction to apothecary jars?  It's unhealthy, I know.

Monday, September 19, 2011

Saturday, September 10, 2011

Color Blitz!

Hope everyone is enjoying a beautiful fall weekend!  We are watching the Iowa/Iowa State football game today and hoping the Cy-Hawk Trophy spends the next year in Ames!  It's been four years since it's been there, so it's time for sure!  If you are from Iowa, went to either school, or just spent any time in the state during the legendary game day weekend, you know how big of a deal this game is.  But you didn't stop over here to read about football, did you?  On to my latest project!

So ever since I domesticated and bought a house, I have been pining for seasonal wreaths.  But man, are they expensive!  Especially since I am turning to Pottery Barn and the like for my dream accessories.  My Mom always told me to wait till they go on clearance at the end of the season, but that never worked out for one reason or another.  They were either picked over, still too pricey, or I simply forgot to look.  I had thought about making my own wreath but it always seemed too expensive.

But then I found a solid grapevine wreath at my favorite thrift store for $2, and I figured, why not?


But yeah, those 80's flowers had to go.  They were easy to take out.  Get a load of the grime that was on them.  Yuck!  I might have sneezed a bit while pulling these off.


So once everything was off, I gave the entire wreath a coat of chocolate brown spray paint.  I wanted to make sure to have a dark, rich base for the fall.  At this point, I was undecided about what I wanted to decorate the wreath with.  I liked the idea of leaves, but I was also liking the idea of some brightly colored flowers.  I looked at Hobby Lobby but didn't see anything I was too crazy about.  I had heard that the Dollar Store can be a DIY'ers paradise, so I gave it a shot.  $12 later, I came home with this pile.  


Sorry for the HORRIBLE picture quality, but I bought these last night and I wanted to work on it right then and there.  So, no natural light for good pictures.  First thing I did was wrap the wreath in some thick, fall ribbon.  I did this so that I'd have a little bit of sparkle, to fill in any holes, and to help hold the stems in.


Please disregard the stuff sitting on the floor in the corner.  Everybody's house has some of that, right?

Then I cut the stems of the flowers so they were all separate.  I took regular scissors and clipped the outside and then bent the wire part till it snapped.  I just slid the flowers under the grapevine and the ribbon in a somewhat random order.  There's no real rhyme or reason to this...it's all about your taste and what you like.


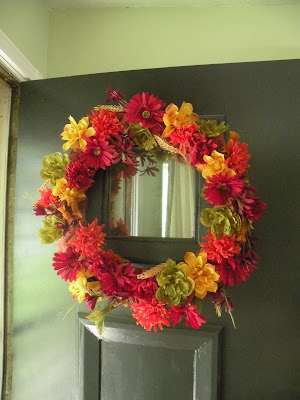
And here's my finished result!  At first, I wasn't sure.  But the more I looked at it, the more it grew on me.  I really like how bright it is, but still within the fall color theme.


I put it together in a little over an hour (not counting shopping or painting) while we watched the season finale of Burn Notice.  I couldn't tell you what all the kinds of flowers I used, but I can identify Dahlias and Gerberas.  I also used some twig like things as fillers.  I went with orange, red, yellow, green, and purple for the flowers and the ribbon is a sheer burnt orange with some gold on the outside.  I didn't glue anything in for a couple reasons.  They flowers stay in place pretty well on their own, and next year, I might want to change it up!  Maybe with leaves.  

So what have you been doing to get ready for fall?  Anyone had their air turned off for a while?  Or how about that season finale of Burn Notice?  Anyone else a little surprised??  And by the way, State is in the lead with 2 minutes left in the 3Q.  Whoot whoot!

Sunday, September 4, 2011

Gimme Five!

Don't you just love putting the final piece of a puzzle in place?  Or putting the finishing touches on a project?  Then you can imagine how excited I was to find these at TJ Maxx this weekend...


Look familiar?  No?  Well, they just so happen to be the shams to this quilt...


And did you see that price tag?


It's upside down, but you see that $5.00 tag?  Looks like it had been marked down three previous times before I snatched them up.  It's like they were just waiting all this time just for me.  I haven't had a chance to wash them and put them on the bed, so no final pictures yet, but I can't wait.  Still waiting on those crisp, white sheets though...

By the way, does anyone else enjoy the thrill of finding out how much you saved by peeling back all the price tags?  Original price was $14.99 (no way I would have paid $15 for shams...), then down to $10, then to $9, $7, and then $5.